Enter your email address:

Delivered by FeedBurner

Monday, August 31, 2020

How To Change Facebook’s Default Theme To Any Color You Want

Change Facebook Theme Using Chrome Extension

How To Change Facebook's Default Theme To Any Color You Want

We are going to share an interesting trick on changing your Facebook default theme. You just need a Google Chrome extension to perform this trick. If you are among me who feels very fatigued with the look of Facebook's by default theme then this is a must-see post because you will find out the easiest trick to make your facebook more attractive than before.

Facebook is a social networking site which empowers people to connect with friends and people around. That's how Facebook is habitually introduced. However, Facebook is beyond the need of being introduced as almost everyone is on it.
   A couple of Days ago I was simply Surfing Google Chrome website and I somehow stumbled upon a Chrome Extension. Yes, a Chrome extension that will give your Facebook a Whole new look. I was apprehensive to try it, So I just installed it and checked my facebook. I was astonished to see my facebook homepage have all new look. I found it refreshing and decided to write steps on How to Change Facebook Themes using Chrome Extension.

How To Change Facebook's Default Theme To Any Color You Want

If You are among me who feels very fatigued with the look of Facebook's by default theme then this is a must-see post, Because you will find out the easiest trick to make your facebook more attractive than before. Simply follow the steps to know about it.

How to Change Facebook Theme Using Chrome Extension

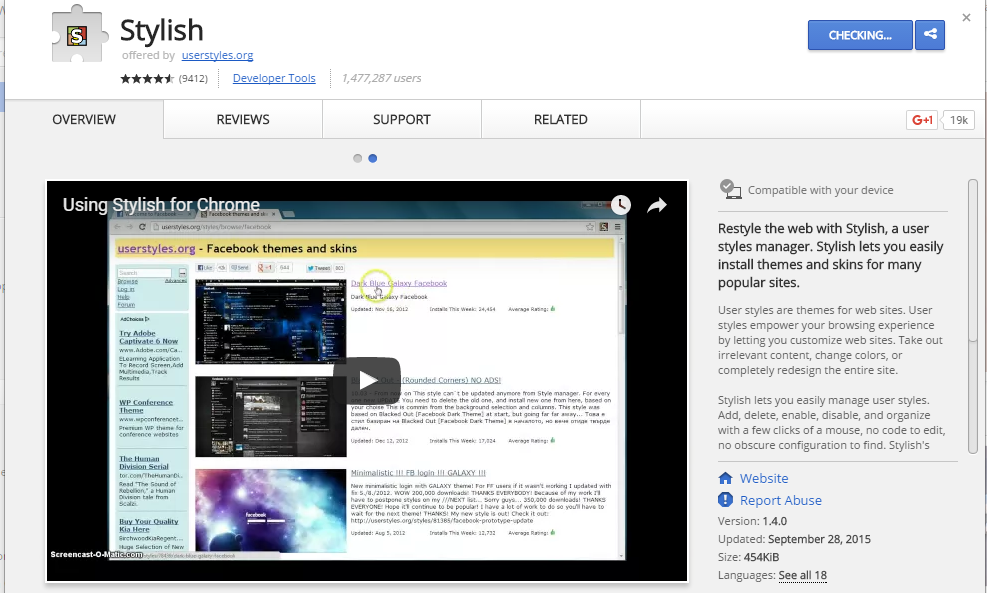
Step 1. Install Stylish for Chrome from the Chrome Web Store. It will take hardly a minute to get installed in your Chrome browser.
Change Facebook Theme Using Chrome Extension
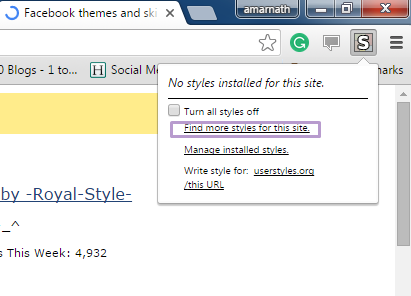
Step 2. Navigate to Facebook.com and click on the S button. Click on Find Styles for this Site to open a new tab with free themes to use for Facebook. Most of the themes are free and attractive too you can easily browse over the full website to discover your favorite theme.
Change Facebook Theme Using Chrome Extension
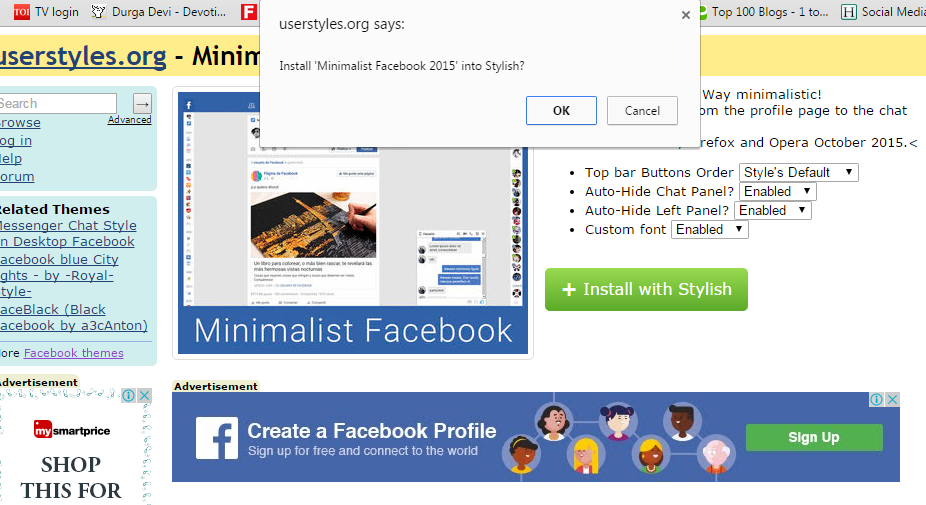
Step 3. Now You will be redirected towards https://userstyles.org Guess what! This site contains huge numbers of Facebook themes, One thing is for sure that you will be confused in-between what to select and which one to skip. Select any them and click on it. Now you will be given a full preview of your selected theme.
Change Facebook Theme Using Chrome Extension
Step 4. If everything is fine in the previewed theme, click on Install with Stylish button at the top right corner of the page. It will take few seconds or minutes depends on your theme size to be installed in Stylish Extension, once installed you will be notified with a success message.
Change Facebook Theme Using Chrome Extension
Step 5. Now whenever you open Facebook, it will show the theme that you have installed with Stylish instead of the boring old blue theme.
Change Facebook Theme Using Chrome Extension

Related news


  1. Hacker Techniques Tools And Incident Handling
  2. Hacking Tools And Software
  3. Hack Tools Online
  4. Growth Hacker Tools
  5. Hacking Tools Usb
  6. Hacker Tools Apk
  7. Hacker Tools List
  8. Tools 4 Hack
  9. Top Pentest Tools
  10. Pentest Tools Free
  11. Hacking Tools Free Download
  12. Underground Hacker Sites
  13. Hacking Tools Download
  14. Hack Tools Online
  15. Hacker Tools Mac
  16. Hacker Security Tools
  17. Kik Hack Tools
  18. Hack Tools For Games
  19. Usb Pentest Tools
  20. Hack Tools Download
  21. Pentest Tools Apk
  22. Hacker Tools For Mac
  23. Hack Tools For Ubuntu
  24. How To Make Hacking Tools
  25. Hacker Tools For Ios
  26. Hacker Tool Kit
  27. Hacking Tools And Software
  28. Hacker Techniques Tools And Incident Handling
  29. Hacker
  30. Pentest Tools Nmap
  31. Hack Tools 2019
  32. Pentest Tools Kali Linux
  33. Hacker Tools Github
  34. Black Hat Hacker Tools
  35. Hacker Techniques Tools And Incident Handling
  36. Install Pentest Tools Ubuntu
  37. Hacker Techniques Tools And Incident Handling
  38. Tools Used For Hacking
  39. Easy Hack Tools
  40. Hacking Tools For Beginners
  41. Hack Tools Pc
  42. Hacker Tools Hardware
  43. Hacking Tools Name
  44. Hack Tools
  45. Ethical Hacker Tools
  46. Pentest Tools For Android
  47. Best Pentesting Tools 2018
  48. Pentest Tools Online
  49. Hacking Tools Pc
  50. Hacking Tools Kit
  51. Pentest Automation Tools
  52. Hack Tool Apk
  53. Pentest Tools Website

Sunday, August 30, 2020

How To Switch From 32-Bit Windows 10 To 64-Bit Windows 10

Microsoft offers Windows 10 as a free upgrade for computers running a genuine copy of Windows 7 or Windows 8.1. Also, similar to previous releases, the operating system is available on different editions and two versions: 32-bit and 64-bit.While upgrading from Windows 10 Home to Windows 10 Pro is not free, what many people are unfamiliar with is that Microsoft won't ask for more money to upgrade from a 32-bit to a 64-bit version.
However, the upgrade path only allows moving from a qualifying version to its equivalent edition on the same architecture. This limit means that if your PC is running a 32-bit version of Windows 8.1, after the upgrade you'll be stuck with the 32-bit version of Windows 10 — even if your computer's processor can handle the 64-bit version. The only solution is to make a clean installation of the operating system and reconfigure all your apps and settings.
iemhacker-how-to-switch-from-32-bit-windows-to 64bit
In this Windows 10 guide, we'll walk you through the steps to verify whether your computer in fact includes support for a 64-bit version and we'll guide you through the upgrade process to Windows 10 (x64).

Make sure Windows 10 64-bit is compatible with your PC

A 64-bit version of Windows can only be installed on computers with capable hardware. As such, the first thing you need to do is to determine whether your computer has a 64-bit processor.
You can easily get this information from the Settings app.
  1. Use the Windows key + I keyboard shortcut to open the Settings app.
  2. Click System.
  3. Click About.
  4. Under System type, you will see two pieces of information: if it says 32-bit operating system, x64-based processor, then it means that your PC is running a 32-bit version of Windows 10 on a 64-bit processor. If it says 32-bit operating system, x86-based processor, then your computer doesn't support Windows 10 (64-bit).

Make Sure Your Processor is 64-bit Capable

First thing's first. Before even thinking of upgrading to 64-bit Windows, you'll need to confirm that the CPU in your computer is 64-bit capable. To do so, head to Settings > System > About. On the right-hand side of the window, look for the "System type" entry.

You'll see one of three things here:

  • 64-bit operating system, x64-based processor. Your CPU does support 64-bit and you already have the 64-bit version of Windows installed.
  • 32-bit operating system, x86-based processor. Your CPU does not support 64-bit and you have the 32-bit version of Windows installed.
  • 32-bit operating system, x64-based processor. Your CPU supports 64-bit, but you have the 32-bit version of Windows installed.
If you see the first entry on your system, you don't really need this article. If you see the second entry, you won't be able to install the 64-bit version of Windows on your system at all. But if you see the last entry on your system—"32-bit operating system, x64-based processor"—then you're in luck. This means you're using a 32-bit version of Windows 10 but your CPU can run a 64-bit version, so if you see it, it's time to move on to the next section.
Make Sure Your PC's Hardware Has 64-bit Drivers Available
Even if your processor is 64-bit compatible, you might want to consider whether your computer's hardware will work properly with a 64-bit version of Windows. 64-bit versions of Windows require 64-bit hardware drivers, and the 32-bit versions you're using on your current Windows 10 system won't work.
Modern hardware should certainly offer 64-bit drivers, but very old hardware may no longer be supported and the manufacturer may have never offered 64-bit drivers. To check for this, you can visit the manufacturer's driver download web pages for your hardware and see if 64-bit drivers are available. You shouldn't necessarily need to download these from the manufacturer's website, though. They are likely included with Windows 10 or automatically will be downloaded from Windows Update. But old hardware—for example, a particularly ancient printer—simply may not offer 64-bit drivers.

Upgrade by Performing a Clean Install

You'll need to perform a clean install to get to the 64-bit version of Windows 10 from the 32-bit one. Unfortunately, there's no direct upgrade path.
Warning: Back up your important files before continuing and also make sure you have what you need to reinstall your programs. This process will wipe your whole hard disk, including Windows, installed programs, and personal files.
First, if you haven't upgraded to Windows 10 yet, you'll need to use the upgrade tool to upgrade. You'll get the 32-bit version of Windows 10 if you were previously using a 32-bit version of Windows 7 or 8.1. But the upgrade process will give your PC a Windows 10 license. After upgrading, be sure to check that your current 32-bit version of Windows 10 is activated under Settings > Update & security > Activation.
Once you're using an activated version of the 32-bit Windows 10, download the Windows 10 media creation tool from Microsoft. If you're using the 32-bit version of Windows 10 at the moment, you'll have to download and run the 32-bit tool.
When you run the tool, select "Create installation media for another PC" and use the tool to create a USB drive or burn a disc with Windows 10. As you click through the wizard, you'll be asked whether you want to create 32-bit or 64-bit installation media. Select the "64-bit (x64)" architecture.
Next, restart your computer (you did back everything up, right?) and boot from the installation media. Install the 64-bit Windows 10, selecting "Custom install" and overwriting your current version of Windows. When you're asked to insert a product key, skip the process and continue. You'll have to skip two of these prompts in total. After you reach the desktop, Windows 10 will automatically check in with Microsoft and activate itself. You'll now be running the 64-bit edition of Windows on your PC.
If you want to go back to the 32-bit version of Windows, you'll need to download the media creation tool—the 64-bit version, if you're running the 64-bit version of Windows 10—and use it to create 32-bit installation media. Boot from that installation media and do another clean install—this time installing the 32-bit version over the 64-bit version.

Final Words :

Finally, you are aware of the way through which you could be able to switch from the 32-bit windows to 64-bit windows really easily. There will be no difference in the functions or the working of the windows yet the only change that you will get is the more advanced architecture that is compatible with numerous high-end apps. If you are thinking to switch your windows to the 64-bit version then make sure you first check for your hardware compatibility. Hopefully, you would have liked the information of this post, please share this post with others if you really liked it. Provide us your valuable views regarding this post through using the comments section below. At last nevertheless thanks for reading this post!
Related posts

  1. Hacking Tools Kit
  2. Pentest Tools Kali Linux
  3. World No 1 Hacker Software
  4. What Are Hacking Tools
  5. Hack Tools For Pc
  6. Hacker Tools Free
  7. Hacker Tools Free Download
  8. Hacking Tools Mac
  9. Hack Tool Apk No Root
  10. Pentest Tools Linux
  11. Computer Hacker
  12. Pentest Tools Website Vulnerability
  13. Black Hat Hacker Tools
  14. Pentest Tools Subdomain
  15. Usb Pentest Tools
  16. What Are Hacking Tools
  17. Termux Hacking Tools 2019
  18. Hacker Security Tools
  19. Growth Hacker Tools
  20. Hacker Tools Software
  21. Easy Hack Tools
  22. Hacking Apps
  23. Hacking Tools Hardware
  24. Hacking Tools For Mac
  25. Usb Pentest Tools
  26. Wifi Hacker Tools For Windows
  27. Hacker Security Tools
  28. Hack Tools
  29. Hacking Tools 2020
  30. Hacking Tools For Windows 7
  31. Pentest Tools Apk
  32. Pentest Tools Linux
  33. Hack Tools Mac
  34. Android Hack Tools Github
  35. How To Install Pentest Tools In Ubuntu
  36. Pentest Tools Framework
  37. Free Pentest Tools For Windows
  38. Growth Hacker Tools
  39. Tools Used For Hacking
  40. Bluetooth Hacking Tools Kali
  41. Top Pentest Tools
  42. Pentest Tools Open Source
  43. Hacker Tools Online
  44. Beginner Hacker Tools
  45. World No 1 Hacker Software
  46. Wifi Hacker Tools For Windows
  47. Pentest Tools Framework
  48. Pentest Tools Port Scanner
  49. Hack Tool Apk No Root
  50. Hacker Tools Hardware
  51. Hack Tools For Windows
  52. Pentest Tools Windows
  53. Hacking Tools Software
  54. Hacker Tools Apk
  55. Beginner Hacker Tools
  56. Hack Tools Download
  57. Pentest Tools Android
  58. Hacker Tools Online
  59. Pentest Tools Url Fuzzer
  60. Hack Tools
  61. Pentest Tools Android
  62. Hacker Tools Apk Download
  63. Hacking Tools Windows 10
  64. Hacking Tools Mac
  65. Pentest Reporting Tools
  66. Pentest Tools Port Scanner
  67. Hacking Tools Kit
  68. Hak5 Tools
  69. Pentest Automation Tools
  70. Hacker Tools List
  71. Hacking Tools And Software
  72. How To Install Pentest Tools In Ubuntu
  73. Tools Used For Hacking
  74. Pentest Recon Tools
  75. Hacking Tools Mac
  76. Hacking Tools Windows 10
  77. Pentest Reporting Tools
  78. Kik Hack Tools
  79. Termux Hacking Tools 2019
  80. Growth Hacker Tools
  81. Hacking Tools For Beginners
  82. Pentest Tools Alternative
  83. Hack Tools Online
  84. Hack Tools For Ubuntu
  85. Bluetooth Hacking Tools Kali
  86. Hacking Tools Online
  87. Hak5 Tools
  88. Pentest Tools For Mac
  89. Hacker Tools 2019
  90. Growth Hacker Tools
  91. Hacker Tools Linux
  92. Hack Tool Apk No Root
  93. Hacking Tools Kit
  94. Hacker Tools For Ios
  95. Hack Tools For Ubuntu
  96. Hacker Tools Github
  97. Nsa Hacker Tools
  98. Pentest Tools Review
  99. Hacker Tools Github
  100. Kik Hack Tools
  101. Hacker Techniques Tools And Incident Handling
  102. Hack Tools Pc
  103. Ethical Hacker Tools
  104. Pentest Recon Tools
  105. Pentest Tools
  106. Hack Tools
  107. Hacking Tools Kit
  108. Hacking Tools For Windows Free Download
  109. Nsa Hacker Tools
  110. Nsa Hack Tools
  111. Wifi Hacker Tools For Windows
  112. Growth Hacker Tools
  113. Blackhat Hacker Tools
  114. Github Hacking Tools
  115. Pentest Tools
  116. Hacker Tools Free Download
  117. Hacking Tools For Games
  118. Hacker Tools Free
  119. Pentest Tools Windows
  120. Hacker Tools Software
  121. Hacker Techniques Tools And Incident Handling
  122. Black Hat Hacker Tools
  123. Hacking Tools And Software
  124. Hacker
  125. World No 1 Hacker Software
  126. Underground Hacker Sites
  127. Pentest Tools Windows
  128. Pentest Box Tools Download

HACKING PASSWORDS USING CREDENTIAL HARVESTER ATTACK

Everything over the internet is secured by the passwords. You need a login to do any stuff on any social or banking website. Passwords are the first security measure for these type of websites. So, I brought a tutorial on how to hack such sort of login passwords. This tutorial is based on credential harvester attack method. In which you will know about hacking passwords using credential harvester attack method.

HACKING PASSWORDS USING CREDENTIAL HARVESTER ATTACK

REQUIREMENTS

It's very simple and easy to follow. Before you start, you need the following things to work with.
  1. Kali Linux OS
  2. Target Website

STEPS TO FOLLOW

  • Run the Kali Linux machine. If you have not Kali Linux installed, you can grab a free copy and install it as a virtual machine. You can learn more about Kali Linux VirtualBox installation.
  • Sign in to Kali Linux by entering username root and password toor.
  • As you'll sign in, navigate to the Applications > Social Engineering Tools > Social Engineering as shown in the following screenshot.
  • Now you will see the different options. You have to choose Social Engineering Attacks by simply entering its number in the terminal. Once you do it, it will show a few options further. Simply choose Website Vector Attack by putting its number.
  • Website vector attack will show up it's a different type of attacks. We are going to use Credential Harvester Attack.
  • Choose the Site Clone option. As you do it, it will ask for your public IP address. Just open up a new terminal and type ifconfig. It'll show the public IP. Just copy it and paste in the previous terminal as shown in the following screenshots.
  • After we do it. Enter the target website of which passwords you want to hack. Make sure to use a website that has username and password on the same page.
  • All done now. As someone opens up the browser on the public IP we specified, it'll show up the website that we entered in the previous step. Now as someone enters their username or password, it will be captured in the terminal.

That's all. If you're not clear yet. You can watch the following complete video tutorial on how to do it.

More information